What is SSR?
Server Side Rendering in Angular is a technique that involves rendering Angular components on the server before sending the resulting HTML to the client, which improves performance, search engine optimization (SEO), and user experience, especially for slower network connections. As web applications grow in complexity, so do the challenges of ensuring quick load times, optimal SEO, and smooth performance across devices. Server-Side Rendering (SSR) in Angular applications is a powerful technique that can supercharge your Angular apps, making them not only faster but also more search engine friendly. Whether you’re looking to enhance the user experience or boost your app’s visibility in search results, SSR is the key to unlocking your Angular application’s full potential. In this article, we dive into the world of Angular SSR, exploring how it works, why it’s essential, and how you can get started.
We will be using Angular 18 for this article to create an angular application with the latest SSR enabled features.
Explore About the latest Topics: Angular 18 Progressive Web Apps & Zoneless Change Detection in Angular 18
How SSR Works in Angular
Server Request
When a user requests a page, the server receives the request.
Component Rendering
The server renders the necessary Angular components on the server-side, using the Angular Universal platform.
HTML Generation
The server converts the rendered components into static HTML
HTML Delivery
The generated HTML is sent to the client’s browser.
Client-Side Hydration
The client-side Angular application takes over, hydrating the rendered HTML with JavaScript to enable interactivity and dynamic updates.
Benefits and Considerations of SSR in Angular
Improved SEO
SSR enables search engines to crawl and index your pages more effectively since the content is rendered on the server before being sent to the client. This is crucial for applications where organic search traffic is a priority, as search engines can easily access the content without relying on client-side JavaScript execution. For applications that rely heavily on SEO to drive traffic, SSR can be a game-changer, improving visibility in search engine results.
Enhanced Performance
By rendering the initial view on the server, SSR reduces the amount of JavaScript the client needs to process before the page becomes interactive. This leads to faster load times, especially for users on slower networks or devices, and can significantly reduce the Time to First Byte (TTFB). SSR is particularly beneficial in regions with slower internet connections or on devices with limited processing power, ensuring users can start viewing and interacting with content more quickly.
Better User Experience
With SSR, users see a fully rendered page sooner, which enhances perceived performance. Even if the JavaScript is still loading, users can start reading and interacting with the content almost immediately. This faster time to first interaction can be crucial for engagement, especially on e-commerce platforms or dynamic content sites, where quick responses are expected.
Improved Accessibility
SSR can make your application more accessible to users with disabilities, as the content is available from the start, and screen readers or other assistive technologies can access it more effectively. This ensures that your site meets accessibility standards and provides a better experience for all users, including those on older browsers or devices that may struggle with client-side JavaScript execution.
Read About: A comprehensive introduction of Angular Signals
Implementing Server-Side Rendering in Angular
Lets create a new angular application with ssr enabled in it and we can see how our application is different from creating an application without ssr enabled.
1. Create an angular project with ssr enabled
ng new ssr-rendering-example --ssr This command will create new additional files in Angular app. To confirm that your application is server-side rendered, run it locally using ng serve. The initial HTML request should include the application’s content.
App Structure
my-app
|– server.ts # application server
└── src
|– app
| └── app.config.server.ts # server application configuration
└── main.server.ts # main server application bootstrapping
The above command would create a server.ts file that sets up a Node.js server using Express and enables Angular to render on the server side. It uses CommonEngine to render Angular applications. Here is the basic server.ts file that is generated by –ssr flag while creating angular application.
import { APP_BASE_HREF } from '@angular/common';
import { CommonEngine } from '@angular/ssr';
import express from 'express';
import { fileURLToPath } from 'node:url';
import { dirname, join, resolve } from 'node:path';
import bootstrap from './src/main.server';
// The Express app is exported so that it can be used by serverless Functions.
export function app(): express.Express {
  const server = express();
  const serverDistFolder = dirname(fileURLToPath(import.meta.url));
  const browserDistFolder = resolve(serverDistFolder, '../browser');
  const indexHtml = join(serverDistFolder, 'index.server.html');
  const commonEngine = new CommonEngine();
  server.set('view engine', 'html');
  server.set('views', browserDistFolder);
  // Example Express Rest API endpoints
  // server.get('/api/**', (req, res) => { });
  // Serve static files from /browser
  server.get('**', express.static(browserDistFolder, {
    maxAge: '1y',
    index: 'index.html',
  }));
  // All regular routes use the Angular engine
  server.get('**', (req, res, next) => {
    const { protocol, originalUrl, baseUrl, headers } = req;

    commonEngine
      .render({
        bootstrap,
        documentFilePath: indexHtml,
        url: `${protocol}://${headers.host}${originalUrl}`,
        publicPath: browserDistFolder,
        providers: [{ provide: APP_BASE_HREF, useValue: baseUrl }],
      })
      .then((html) => res.send(html))
      .catch((err) => next(err));
  });
  return server;
}
function run(): void {
  const port = process.env['PORT'] || 4000;

  // Start up the Node server
  const server = app();
  server.listen(port, () => {
    console.log(`Node Express server listening on http://localhost:${port}`);
  });
}
run();
2. Serve
ng serve3. Test the App in Browser
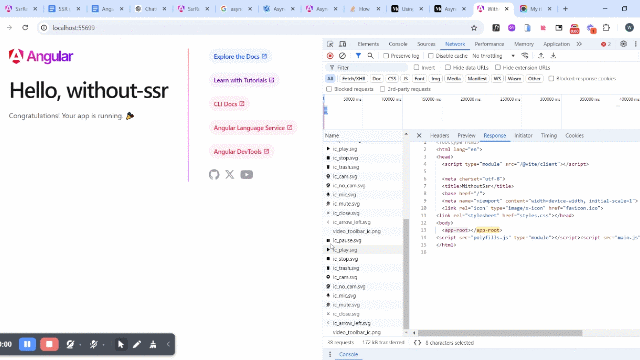
Open your browser and navigate to http://localhost:4200. Right-click on the page and select “Inspect” or press Ctrl+Shift+I (on Windows/Linux) or Cmd+Option+I (on Mac) to open the browser’s Developer Tools.
Go to the “Network” tab.
Reload the page.
In the “Network” tab, look for the first request to the server.
Click on this request and navigate to the “Response” tab to view the HTML content that was returned by the server.
Output with SSR enabled
Output without SSR enabled
Hydration
Hydration is a crucial process in server-side rendering (SSR) that allows the client to reuse the server-rendered DOM structures, maintain application state, and transfer data retrieved by the server. It improves performance by avoiding unnecessary DOM re-creation, leading to better Core Web Vitals (CWV) metrics like First Input Delay (FID), Largest Contentful Paint (LCP), and Cumulative Layout Shift (CLS). Without hydration, SSR applications may experience UI flickering and degraded performance, as the DOM would be destroyed and re-rendered. Enabling hydration ensures smoother transitions and enhances both user experience and SEO.
Hydration can be enabled or disabled manually. By default, –ssr flag will add the provideClientHydration() in providers array in app.config.ts:
export const appConfig: ApplicationConfig = {
  providers: [provideZoneChangeDetection({ eventCoalescing: true }), provideRouter(routes),
    provideClientHydration(),
  ]
};
Avoiding Browser-Specific Code in Angular Components
When creating Angular components, it’s essential to be aware of browser-specific features that might not be available on the server. This includes:
Global Objects: Avoid using browser-only global objects like window, document, navigator, or location.
HTMLElement Properties: Be cautious about using properties of HTMLElement that might not be supported server-side.
To ensure that code relying on browser-specific features runs only in the browser, use the afterRender and afterNextRender lifecycle hooks. These hooks are executed exclusively on the browser and skipped on the server.
Example
Here is the example of how afterRender and afterNextRender lifecycle hooks work in server side rendered apps.
app.component.ts FIle
import { afterNextRender, afterRender, Component } from '@angular/core';
import { RouterOutlet } from '@angular/router';
@Component({
  selector: 'app-root',
  standalone: true,
  imports: [RouterOutlet],
  templateUrl: './app.component.html',
  styleUrl: './app.component.css'
})
export class AppComponent {
  title = 'ssr-rendering-example';
  ButtonState = 'Default';

  constructor() {
    afterNextRender(() => {
      console.log('afterNextRender is called ');
    });

 afterRender(() => {
      console.log('after Render is called whenever there is change in buttonState ', this.ButtonState);
    })
  }
  StateChange() {
    this.ButtonState = "Changed"
    setTimeout(() => {
      this.ButtonState = "Default";
    }, 1000)
  }
  }
app.component.html file
<button (click) = "StateChange()">{{ButtonState}}</button>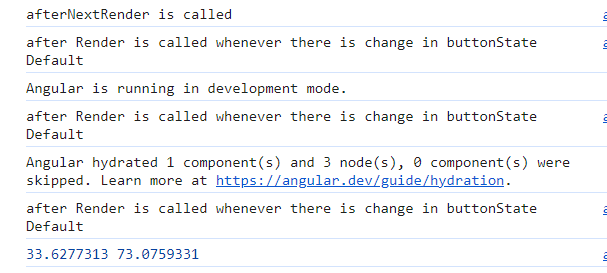
HttpClient Caching for Optimized Performance
HttpClient can enhance your application’s performance by storing frequently accessed data. When running on the server, HttpClient caches outgoing network responses, serializes them, and includes them in the initial HTML sent to the browser. The browser then checks if the cached data is available and reuses it during initial rendering, avoiding unnecessary network requests. Once the application becomes stable, HttpClient stops using the cache to ensure freshness. By default, HttpClient caches all HEAD and GET requests that don’t require authentication. You can customize this behavior using withHttpTransferCacheOptions when providing hydration.
export const appConfig: ApplicationConfig = {
  providers: [
provideZoneChangeDetection({ eventCoalescing: true }),
provideRouter(routes), provideHttpClient(withFetch(), withInterceptorsFromDi()),
    	provideClientHydration(withHttpTransferCacheOptions
({
      		includePostRequests: true,
    	})
),
  ]
};
Example
1. Create a new component and service
ng g c components/products
ng g s services/products
2. Update the component file (src/app/components/products/products.component.ts)
import { Component } from '@angular/core';
import { ProductsService } from '../../services/products.service';
@Component({
  selector: 'app-products',
  standalone: true,
  imports: [],
  templateUrl: './products.component.html',
  styleUrl: './products.component.css'
})
export class ProductsComponent {
  products: any = [];
  constructor(private productsService: ProductsService) {}
  ngOnInit(): void {
    this.productsService.getProducts().subscribe((products) => {
      this.products = products;
      console.log('this.products = ', this.products);
    });
  }
}
3. Update the template to display products list (src/app/components/products/products.component.html)
<p>products works!</p>
@for (product of products; track $index) {
  <div class="product" style="border-bottom: 1px solid gray;">
    {{product.description}}
  </div>
}
4. Update the Service file (src/app/services/products.service.ts)
import { withHttpTransferCacheOptions } from '@angular/platform-browser';
import { HttpClient } from '@angular/common/http';
import { Injectable } from '@angular/core';

@Injectable({
  providedIn: 'root'
})
export class ProductsService {

  constructor(private http: HttpClient) { }
  getProducts() {
    return this.http.get("https://fakestoreapi.com/products", {});
  }
}
5. Update the root file (src/app/app.component.html)
<button (click) = "StateChange()">{{ButtonState}}</button>
<router-outlet></router-outlet>
6. Build and Serve the application
ng build7. Test the application
Open your browser and navigate to http://localhost:4200. We can see the result below with and without providing hydration in the networks tab.
Conclusion
Server-side rendering (SSR) in Angular is a powerful technique that enhances application performance, improves SEO, and delivers a better user experience. By rendering the initial view on the server, SSR ensures faster load times and accessibility, particularly on slower networks or older devices. Implementing SSR in Angular requires careful consideration of server compatibility and hydration to maximize performance benefits and avoid common pitfalls. When used effectively, SSR can significantly elevate the responsiveness and search engine visibility of your Angular applications, making it an essential tool for modern web development.
Feel free to reach out if you need further assistance or if you’re looking to Hire Angular 18 developer for your project!