Introduction
In the ever-evolving world of technology, data drives decision-making processes. As we advance into AI and machine learning applications, the methods for storing, searching, and retrieving data must evolve as well. This is where Vector Database step in. Traditional databases handle structured data well, but they struggle with unstructured or complex data, particularly in AI-driven environments. Vector databases solve this problem by efficiently managing similarity search and matching.
In this article, we’ll explore what Vector DBs are, why they matter, and how you can use them in your applications, including how to perform basic CRUD (Create, Read, Update, Delete) operations using Pinecone with Node.js and Express. Here, we’re using Node version 20, the ‘pinecone-database’ npm package version 3.0.2, and Hugging Face Inference npm package version 2.8.0.
What is a Vector Database?
A Vector Database specializes in storing data as high-dimensional vectors. It uses these vectors to represent unstructured data like text, images, and audio. The system converts each piece of data into a vector and stores them in the database. What sets vector databases apart from traditional databases is their ability to efficiently perform similarity searches. Instead of finding exact matches, vector databases focus on identifying data similar based on the distance or similarity between vectors.
For example, think of how a search engine suggests related content. A vector database could help by comparing the vectors of the content you search for against vectors of other content in the database to find the closest matches.
What Are Embeddings?
Embeddings are a way to represent complex data, like text, images, or audio, in a form that a machine can understand—typically as numbers. Imagine trying to explain the meaning of a sentence to a computer. Instead of using words, embeddings convert the sentence into a series of numbers (often called a vector), which captures the core meaning of the sentence.
What Are Vectors?
Vector is essentially a list of numbers that represents data in a mathematical way. When we talk about vectors in the context of databases or machine learning, we’re referring to the numerical representations (or embeddings) of complex data like text or images.
What Are Dimensions?
Dimensions in the context of vectors refer to the number of values in a vector. Each value in the vector represents a specific feature or characteristic of the data. For example, if a vector has 128 dimensions, it means that the data is represented by 128 individual values, each describing a different aspect of that data.
Why Use a Vector Database?
Traditional databases store data as rows and columns, which works well for structured information but not for unstructured or complex data like documents, images, or user behavior. Here’s why you should consider a vector database:
Efficient Similarity Search: Unlike traditional databases, vector DBs excel at finding the closest match, making them ideal for recommendation engines, image recognition, and natural language processing tasks.
Scalability: Vector databases are designed to scale as your data grows, ensuring efficient retrieval even with large datasets.
AI/ML Integration: With the rise of machine learning and AI, more data needs to be stored and accessed in vector format, making vector databases essential for future-proofing applications.
Handling High-Dimensional Data: Traditional databases struggle with high-dimensional data, but vector databases are designed to handle it smoothly.
Ease of Integration: Most vector databases, like Pinecone, offer easy integration with modern tech stacks like Node.js, making them accessible even for developers new to the field.
Learn about: Integrating AI and Machine Learning with WordPress
What We Will Do in This Article
In this article, we’ll walk through the process of building a Node.js/Express application that interacts with a vector database using Pinecone by creating a simple blog posts CRUD application.
Here’s what we’ll cover step by step:
Create a New Node/Express App
Start by setting up a new Node.js project and initializing it with npm. This involves creating a new directory for the project and running the necessary commands to set up a package.json file.
Install Required Packages
Install the essential packages for our project, including
express
@pinecone-database/pinecone
@huggingface/inference
body-parser dotenv morgan cors nanoid
Set Up Folder Structure
Organize the project by creating a folder structure that separates different parts of the application. This typically includes folders for controllers and routes.
Create the Server File
Set up the main server file (server.mjs) where you configure and start the Express server. This file will also import and use the routes we’ll define.
Define Routes
Create a routes file that outlines the endpoints for our CRUD operations. These routes will be used to handle requests for inserting, retrieving, updating, and deleting vectors.
Create Controller
Implement the controller file(s) where the logic for each operation is defined. In this step, we import necessary modules, initialize them, and write functions to handle CRUD operations.
Create and Test POST Request
Develop the POST request functionality to insert vectors into Pinecone. After creating the endpoint, test it to ensure that vectors are being correctly inserted.
Create and Test GET Request
Implement the GET request to retrieve vectors by their IDs. Once the endpoint is set up, test it to verify that it returns the correct vector data.
Create and Test UPDATE Request
Build the PUT request to update existing vectors. Test this request to ensure that updates are applied correctly to the vectors in the database.
Create and Test DELETE Request
Develop the DELETE request to remove vectors from Pinecone. After creating this functionality, test it to confirm that vectors are being deleted as expected.
Bonus: Search in vector Databases
In addition to CRUD operation, vector databases offers powerful search capabilities.In section, we’ll explore how to perform searches in a vector database and how this functionality works under the hood.
By following these steps, you’ll have a fully functional Node.js/Express application that performs CRUD operations with a Pinecone vector database. Each step builds upon the previous one, ensuring that you have a clear, working example of how to manage vector data.
Prerequisites
Before diving into the practical part of this article, here’s what you’ll need:
A Pinecone account. Pinecone is a popular vector database service that provides scalable vector storage and search capabilities.
A HuggingFace account.
Postman or similar tools for testing your APIs.
Note: In this article, I am a model From Hugging Face to convert data into embeddings. However, you can use any model of your choice, such as on from OpenAI or another provider that you prefer.
Let’s create a new Node/Express App
Step 1: Create a New Node.js/Express Project
First, let’s create a new Node.js project. Run the following commands in your terminal:
mkdir vector-db-crud
cd vector-db-crud
npm init -y
This will create a new Node.js project and generate a package.json file. After that, install the required packages:
npm i express
@pinecone-database/pinecone
@huggingface/inference
body-parser dotenv morgan cors nanoid
Note: We are using ‘dotenv‘ for environment variable management. However, you can also use Node.js’s build-in environment flags to initialize the environment file if you prefer.
Step 2: Set Up Folder Structure
To keep things organized, we’ll create the following folder structure for our project:
vector-db-crud/
├── controllers/ # Contains CRUD logic
├── routes/ # Defines routes for API endpoints
├── server.js # Main server file
├── package.json
├── .env #Environment Variables
└── node_modules/
Create the controllers and routes folders, and a server.mjs file in the root directory.
Step 3: Create the Server File
In the server.mjs file, we’ll set up our Express server:
import "dotenv/config"
import express from "express";
const app = express();
import cors from "cors";
import bodyParser from "body-parser";
import morgan from "morgan";
const PORT = process.env.PORT || 7000;
app.use(morgan('dev'));
app.use(express.urlencoded({ extended: true }));
app.use(bodyParser.json());
app.use(cors());
import postRoutes from './Routes/postRoutes.mjs';
app.use('/api', postRoutes);
export default app
//Starting the app
app.listen(PORT, () => {
    console.log(`Server is running in ${process.env.NODE_ENV} mode on port ${PORT}`);
})
Here, we’ve included the routes, which we’ll define in the next step.
Step 4: Set Up Routes
Next, let’s define the routes for handling CRUD operations. In the routes folder, create a file called postRoutes.mjs:
import express from 'express';
const Router = express.Router();
import { createPost, getAllPosts, deleteAllPosts, updatePostById } from '../controllers/postController.mjs';
//routes
Router.post('/create-post', createPost);
Router.get('/get-all-posts', getAllPosts);
Router.delete('/delete-all-posts', deleteAllPosts);
Router.patch('/update-one-by-id/:id', updatePostById);
export default Router
Step 5: Create the Controller
Now in your controllers folder, create a new file named postController.mjs. Inside this file, import the required modules, set up the Pinecone API integration, and initialize the logic for inserting vectors.
Pinecone Client: Configured with an API key to perform operations on a Pinecone vector database.
Unique ID Generator: Creates 10-character unique IDs using a custom alphabet.
Hugging Face Inference Client: Configured with an API token to perform model inference tasks.
Pinecone Index: Initializes a client for a specific Pinecone index to store and retrieve data.
import { Pinecone } from '@pinecone-database/pinecone';
import { customAlphabet } from "nanoid"
const pineconeClient = new Pinecone({
    apiKey: process.env.PINE_CONE_API
});
const nanoid = customAlphabet('abcdefghijklmnopqrstuvwxyz0123456789', 10);
//huggingface inference start
import { HfInference } from "@huggingface/inference";
const HF_TOKEN = process.env.HUGGING_FACE_TOKEN;
const inference = new HfInference(HF_TOKEN);
//huggingface inference end

const pcIndex = pineconeClient.Index(process.env.PINE_CONE_INDEX);
Step 6: Create Post Request
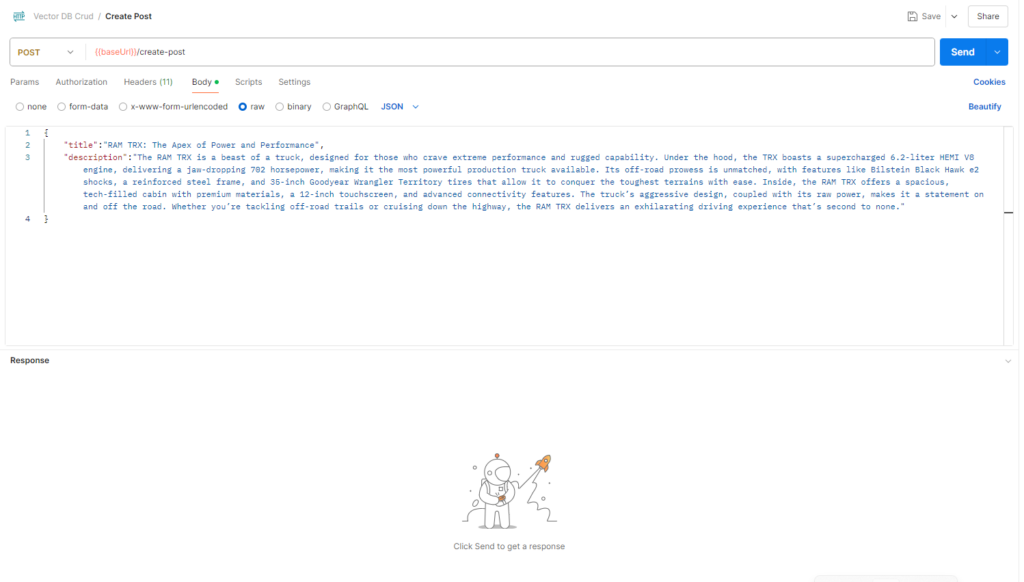
Inside postController.mjs file, create
export const createPost = async (req, res) => {
    try {
        let vector = await inference.featureExtraction({
            model: "sentence-transformers/distilbert-base-nli-mean-tokens",
            inputs: req.body.title + "" + req.body.description,
        });
        console.log("vector created", vector)
        const PineconeRecord = {
            id: nanoid(),
            values: vector,
            metadata: {
                title: req.body.title,
                description: req.body.description,
                createdAt: new Date().getTime()
            }
        };
        await pcIndex.upsert([PineconeRecord]);
        res.json({ message: 'Post created successfully' })
    } catch (error) {
        res.json({ message: error })
    }
}
export default { createPost }
Test the POST method using Postman or any API client by sending a vector in the request body.
Step 7: Create the Get Method (GET Request)
export const getAllPosts = async (req, res) => {
    try {
        let vector = await inference.featureExtraction({
            model: "sentence-transformers/distilbert-base-nli-mean-tokens",
            inputs: ""
        });
        let data = await pcIndex.query({
            topK: 100,
            includeValues: true,
            includeMetadata: true,
            vector: vector
        })
        res.json({
            message: "Posts found!",
            totalDocs: data.matches.length,
            Result: data.matches,
        })
    } catch (error) {
        res.json({
            message: error.message
        })
    }
}
export default { getAllPosts }
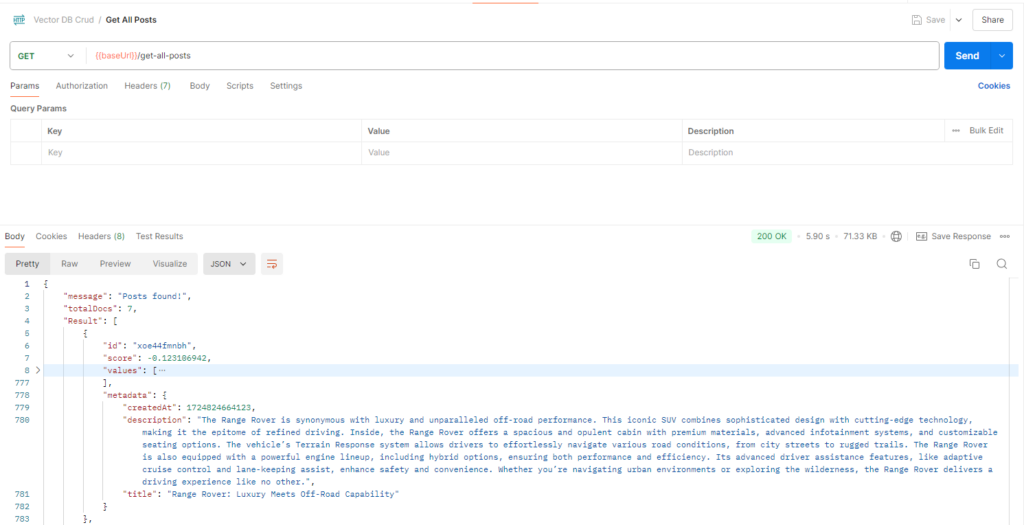
The `getAllPosts` function retrieves posts from Pinecone based on a vector query. It generates an empty vector (since no specific vector match is required) and queries Pinecone to return up to 100 records with all vector values and metadata included. The `topK` parameter specifies the maximum number of records to return, which can be up to 10,000. The function then responds with the total number of matched posts and their details.
After completing this, test the GET method by querying an existing vector.
Step 8: Create the Update Method (PUT Request)
For updating an existing vector, use the same upsert logic:
export const updatePostById = async (req, res) => {
    try {
        await pcIndex.update({
            id: req.params.id,
            metadata: {
                title: req.body.title
            }
        });
        res.json({
            status: true,
            message: `Record with id ${req.params.id} updated!`
        })
    } catch (error) {
        res.json({
            message: error.message
        })
    }
}
export default { updatePostById }
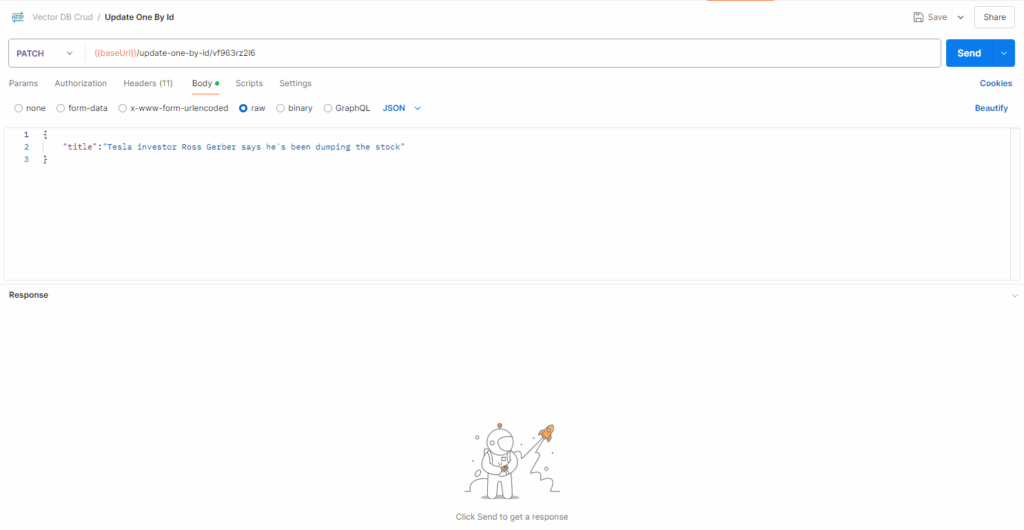
Test the PATCH method to ensure the update works as expected.
Step 9: Create the Delete Method (DELETE Request)
Lastly, implement the delete functionality:
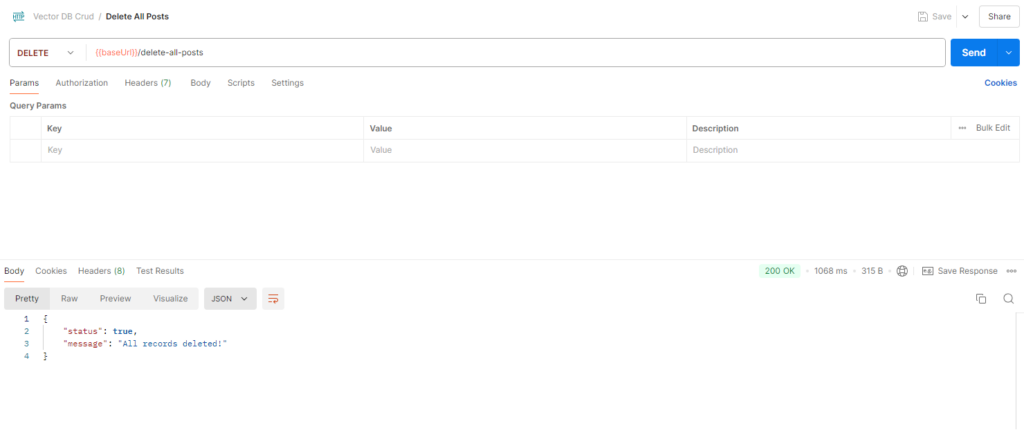
export const deleteAllPosts = async (req, res) => {
    try {
        await pcIndex.namespace().deleteAll();
        res.json({
            status: true,
            message: "All records deleted!"
        })
    } catch (error) {
        res.json({
            message: error.message
        })
    }
}
export default { deleteAllPosts }
Test the DELETE method to ensure vectors are removed properly.
Bonus: Search in Vector Databases
Vector search involves finding vectors that are similar to a given query vector. This is particularly useful for applications like recommendation systems, image and text retrieval, and similarity searches. Unlike traditional databases that use exact matches, vector search is based on finding approximate matches in a high-dimensional space.
Let's Build Search Functionality in our Existing App
export const searchPosts = async (req, res) => {
    try {
        let vector = await inference.featureExtraction({
            model: "sentence-transformers/distilbert-base-nli-mean-tokens",
            inputs: req.params.searchTerm
        });
        let data = await pcIndex.query({
            topK: 20,
            includeValues: false,
            includeMetadata: true,
            vector: vector
        })

        data.matches.map(eachMatch => {
            console.log(`score ${eachMatch.score.toFixed(3)} => ${JSON.stringify(eachMatch.metadata)}`)
        })
        res.json({
            message: "Search Results!",
            totalDocs: data.matches.length,
            Result: data.matches,
        })
    } catch (error) {
        res.json({
            message: error.message
        })
    }
}
export default { searchPosts }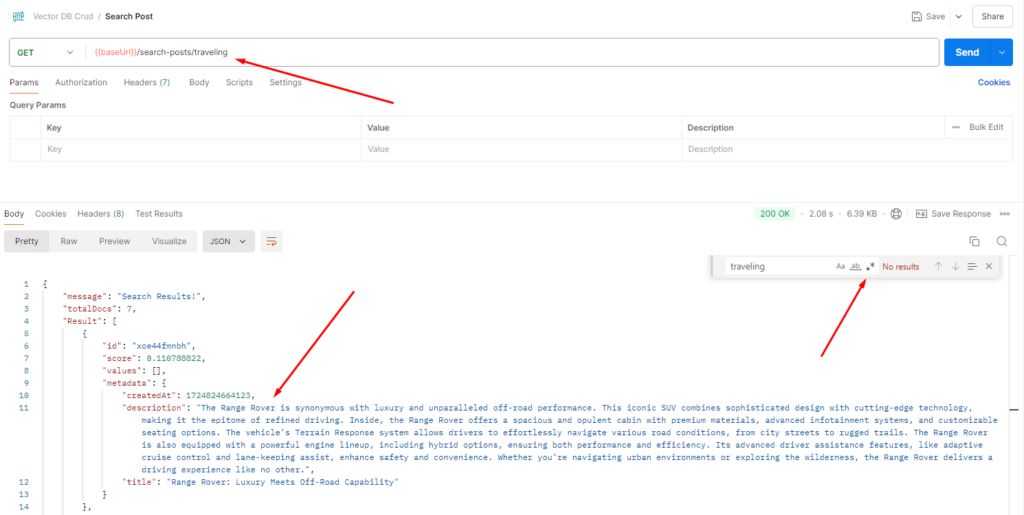
In this example, let’s say we search for “traveling.” Even though our content doesn’t explicitly mention the word “traveling,” we might get results related to “Range Rover posts.” This happens because the vector-based search is looking for content that’s relevant to the concept of “traveling,” not just exact keyword matches. Since “Range Rover” is associated with travel, it appears in the search results.
Use Cases of Vector Databases
As Vector databases have a wide range of applications. Here are some common use cases:
Recommendation Engines: For apps like eCommerce or streaming services, vector DBs are used to recommend similar products or media based on user preferences.
Image Recognition: In applications where you need to find similar images, vector databases can store image embeddings and perform fast, efficient searches.
Natural Language Processing: NLP applications, such as chatbots, sentiment analysis, and document similarity, benefit greatly from the ability to store and retrieve high-dimensional vector representations of text.
Fraud Detection: By storing user behavior patterns as vectors, vector databases can help detect unusual activity by comparing it to a baseline of “normal” behavior.
Conclusion
In conclusion, vector databases are revolutionizing how we store and search data, especially in AI and machine learning contexts. By enabling efficient similarity searches, they outperform traditional databases for unstructured and complex data. With tools like Pinecone and Node.JS, you can easily integrate vector databases into your applications and perform CRUD operations with ease. As AI and data-driven applications continue to grow, vector databases will become an increasingly important tool in your development toolkit.
If you need further assistance or want to Hire Vector Databases expert from The Right Software feel free to contact.


