Introduction
In the ever-evolving world of web development, creating applications that are fast, reliable, and engaging across all devices is crucial. Progressive Web Apps (PWAs) have emerged as a powerful solution to bridge the gap between web and mobile apps. With Angular, one of the most popular web frameworks, building PWAs becomes a seamless experience. This article will explore what PWAs are, how they integrate with Angular, and the benefits Angular PWA bring to your web projects.
What is PWA?
A Progressive Web App (PWA) is a type of web application that leverages modern web capabilities to deliver an app-like experience to users. PWAs are designed to be reliable, fast, and engaging. They work on any platform that uses a standards-compliant browser, which means they can be accessed on mobile devices, tablets, and desktops alike.
Key features of PWAs
Offline Access: PWAs can function offline or with poor network connections using service workers.
Responsive Design: They adapt to various screen sizes and orientations.
App-like Feel: PWAs offer a full-screen experience without a browser toolbar, making them feel like native apps.
Push Notifications: PWAs can send push notifications, increasing user engagement.
Installability: Users can install PWAs on their home screens without visiting an app store.
Cross-Platform Compatibility: PWAs work seamlessly across different devices and operating systems, ensuring a wider reach.
Reduced Development Costs: You can build a single PWA instead of developing separate applications for iOS, Android, and Web.
Fast Loading Times: PWAs are designed to load quickly, providing a smooth user experience.
SEO-Friendly: Unlike native apps, PWAs are discoverable by search engines, improving visibility.
Understanding Angular PWA
Angular is a powerful framework for building web applications, and it includes built-in support for PWAs. When you create an Angular project, you can easily convert it into a PWA with minimal configuration. Angular provides a service worker out of the box, which is the backbone of any PWA, enabling features like offline access, caching, and background sync.
Read about How to Integrate Stripe Payments with Angular
To turn an Angular application into a PWA, Angular CLI provides the @angular/pwa package. This package adds all the necessary files and configurations to make your Angular app PWA-ready. These include a manifest file, service worker configuration, and icons for different device
How PWA Works
Let’s go through a basic example of converting an Angular application into a PWA.
1. Create an Angular Project:
ng new my-angular-pwa

cd my-angular-pwa
2. Add PWA Support:
Install the PWA package using Angular CLI:
ng add @angular/pwaThis command does the following:
Adds the @angular/service-worker package to your project.
Updates your angular.json file to include service worker configuration.
Adds a manifest.webmanifest file in your src/ folder.
Updates your index.html to include links to the manifest and icons.
The ng add command creates a default service worker configuration file (ngsw-config.json). You can customize it to fit your app’s needs. Here’s a basic example:
{
  "index": "/index.html",
  "assetGroups": [
    {
      "name": "app",
      "installMode": "prefetch",
      "resources": {
        "files": [
          "/favicon.ico",
          "/index.html",
          "/*.css",
          "/*.js"
        ]
      }
    },
    {
      "name": "assets",
      "installMode": "lazy",
      "updateMode": "prefetch",
      "resources": {
        "files": [
          "/assets/**",
          "/*.(png|jpg|gif|svg)"
        ]
      }
    }
  ]
}
3. Build and Serve:
After adding the PWA support, build the project:
ng buildNow, you can serve the app using a simple HTTP server like http-server to see the PWA in action:
npm install -g http-server

http-server -p 8080 -c-1 dist/my-angular-pwa
4. Test the PWA:
Open the app in a browser and check the “Add to Home Screen” prompt. You can also go offline and see how the app still functions, thanks to the service worker.
5. Customize Your PWA:
Manifest: Customize manifest.webmanifest to include your app’s name, icons, theme color, and other properties.
Icons: Replace the default icons in the src/assets/icons/ directory with your app’s icons.
Service Worker: Modify ngsw-config.json to fine-tune caching strategies for different resources.
Example Code: manifest.webmanifest
{
  "name": "My Angular PWA",
  "short_name": "PWA",
  "theme_color": "#1976d2",
  "background_color": "#fafafa",
  "display": "standalone",
  "scope": "/",
  "start_url": "/",
  "icons": [
    {
      "src": "assets/icons/icon-72x72.png",
      "sizes": "72x72",
      "type": "image/png"
    },
    {
      "src": "assets/icons/icon-96x96.png",
      "sizes": "96x96",
      "type": "image/png"
    }
    // Add more icon sizes as needed
  ]
}
This simple example shows how Angular makes it straightforward to convert a traditional web app into a PWA with just a few commands. You can also make your existing Angular project into PWA.
Lets enhance our Angular PWA app & fetches data from an API.
Now, let’s enhance the app we created above to fetch data from an API in six steps. First, we’ll create a new service and use an API like JSONPlaceholder to fetch data. In the second step, we’ll create a component to display this data. Step three involves importing this component into the app component to show the posts. In step four, we’ll configure the service worker to enable offline support. Next, in step five, we’ll build and serve the application. Finally, in step six, we’ll test the application to ensure everything works as expected.
Step 1: Create an API Service
Next, create a service to fetch data from an API. For this example, we’ll fetch data from a public API like JSONPlaceholder.
1. Generate a service:
ng generate service data2. Implement the service (src/app/data.service.ts):
import { Injectable } from '@angular/core';
import { HttpClient } from '@angular/common/http';
import { Observable } from 'rxjs';

@Injectable({
  providedIn: 'root'
})
export class ApiService {

  private apiUrl = 'https://jsonplaceholder.typicode.com/posts';

  constructor(private http: HttpClient) {}

  getPosts(): Observable<any> {
    return this.http.get<any>(this.apiUrl);
  }
}
Step 2: Create a Component to Display Data
Now, create a component to display the data fetched from the API.
1. Generate a component:
ng generate component posts2. Update the component (src/app/posts/posts.component.ts):
import { Component, OnInit } from '@angular/core';
import { CommonModule } from '@angular/common';
import { ApiService } from '../api.service';

@Component({
  selector: 'app-posts',
  templateUrl: './posts.component.html',
  styleUrls: ['./posts.component.css'],
})
export class PostsComponent implements OnInit {

  posts: any[] = [];

  constructor(private apiService: ApiService) {}

  ngOnInit(): void {
    this.apiService.getPosts().subscribe(data => {
      this.posts = data;
    });
  }
}
3. Create the template to display the posts (src/app/posts/posts.component.html):
<div class="container p-5">
  <div *ngIf="posts.length === 0">
    <p>Loading posts...</p>
  </div>
  <div class="list-group" *ngIf="posts.length > 0">
    <a *ngFor="let post of posts" href="#" class="list-group-item list-group-item-action" aria-current="true">
      <div class="d-flex w-100 justify-content-between">
        <h5 class="mb-1">{{post.title}}</h5>
        <small>{{post.id}}</small>
      </div>
      <p class="mb-1">{{post.body}}</p>
    </a>
  </div>
</div>
Step 3: Update the Root Component to Display Posts
Now, update your root component to display the PostsComponent.
1. Update the src/app/app.component.ts:
import { Component } from '@angular/core';

@Component({
  selector: 'app-root',
  templateUrl: './app.component.html',
  styleUrls: ['./app.component.css'],
})
export class AppComponent {
  title = 'PWA App';
}
2. Update the src/app/app.component.html:
<h1>{{ title }}</h1>
<app-posts></app-posts>
Step 4: Configure Service Worker for Offline Support
To make your app work offline, the service worker needs to cache the API responses. Open the ngsw-config.json file and update it as follows:
"dataGroups": [
{ "name": "api-calls", "urls": [ "https://jsonplaceholder.typicode.com/posts"
],
"cacheConfig": {
"strategy": "freshness",
"maxSize": 100,
"maxAge": "1d",
"timeout": "10s"
}
}
]
Just add this array after the assetsGroup array.
Step 5: Build and Serve the Application
Build your application for production to enable the service worker:
ng buildServe your application locally with a simple HTTP server to test the PWA:
npm install -g http-server
http-server -p 8080 -c-1 dist/pwa-api-app
Step 6: Test the PWA
Open your browser and navigate to http://localhost:8080.
You should see the list of posts fetched from the API.
To test offline capabilities, disable your network and refresh the page. If the app is working correctly, the posts should still be displayed.
When you open your PWA in the browser, it looks like this:
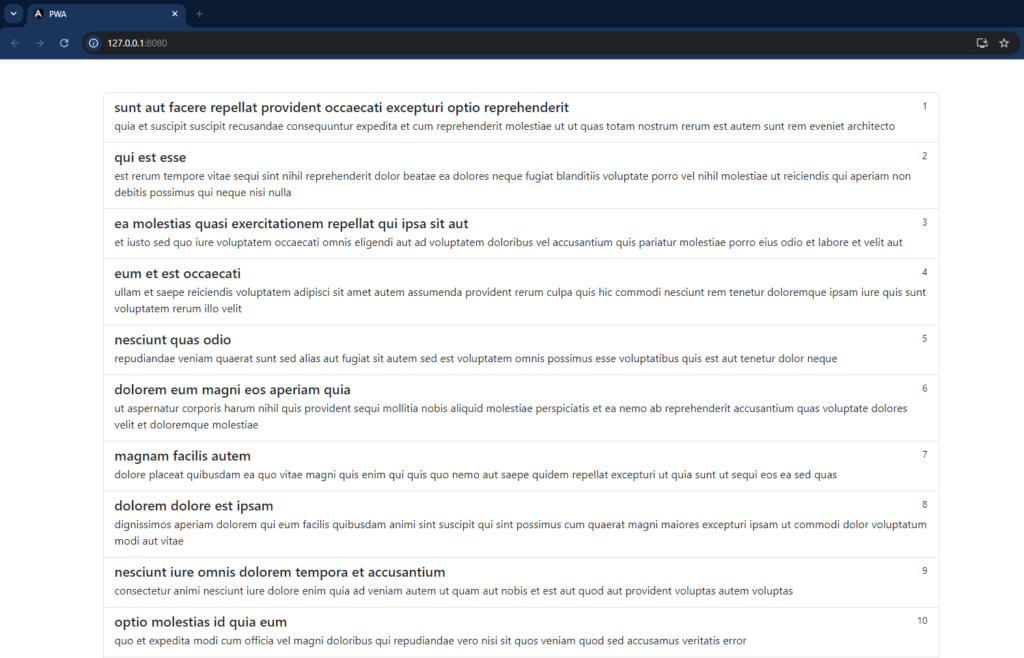
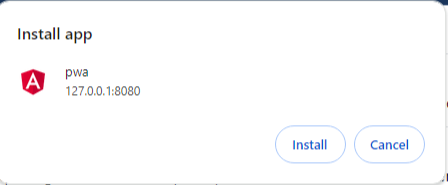
In the right corner of address bar there is an icon like a screen with down arrow:

By clicking on this icon, an alert modal appears like this:
By clicking on the install button, your PWA is installed on your system and opens in a new window that looks like this:
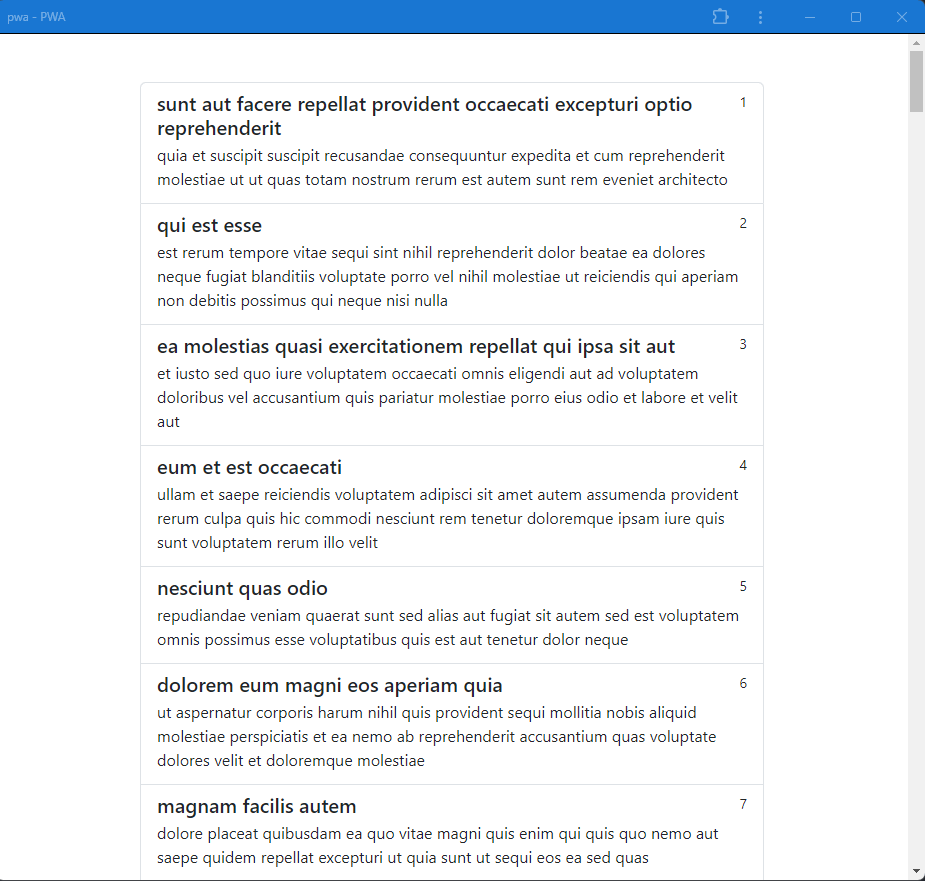
And a shortcut is created on your desktop, like other system apps, with your app’s favicon and name.
Use Cases of PWAs with Examples
1. E-commerce Platforms
2. News and Content Websites
PWAs are perfect for news websites. The Washington Post PWA loads content nearly instantly and allows users to read articles offline
3. Social Media Platforms
PWAs work well for social media platforms. Twitter Lite reduced data usage by up to 70% and increased tweets sent by 75%, proving that a lightweight PWA
4. Entertainment and Streaming Services
PWAs can have offline access to content and a smooth, app-like interface for streaming services. Spotify’s PWA allows users to listen to music directly from the browser, offering a similar experience to the native app.
5. Travel and Booking Platforms
PWAs are effective for travel and booking platforms. Trivago PWA has improved user engagement, increased click-through rates by 97%.
6. Food Delivery Services
PWAs in food delivery services. Starbucks built a PWA that allows users to browse the menu, customize their orders, and add items to their cart, all offline
7. Utility and Productivity Tools
PWAs are ideal for productivity tools. Google Maps Go is a lightweight PWA that provides essential map functionality on devices with limited storage or network capabilities.
8. Financial Services
PWAs can offer financial services firms. Alibaba’s PWA saw a 76% increase in conversion rates and a 14% increase in monthly active users
9. Media and Publishing
PWAs are well-suited for media and publishing companies. Forbes’ PWA reduced load time to under 0.8 seconds and increased engagement by 100%.
For Non-Angular Apps
To convert a non-Angular app into a Progressive Web App (PWA), you’ll first need to ensure that the app meets the basic requirements of a PWA, such as having a responsive design and being served over HTTPS.
Next, you’ll need to create a `manifest.json` file, which defines the app’s metadata, including its name, icons, theme color, and start URL. This file helps the app appear more like a native app when installed on a user’s device. Then, you’ll implement a service worker, a script that runs in the background and handles caching, offline functionality, and push notifications.
You can either write the service worker manually or use libraries like Workbox to simplify the process. Once the service worker is set up, configure it to cache static assets and API responses, enabling your app to work offline. Finally, test your PWA thoroughly across different devices and browsers, ensuring that it installs properly and functions as expected both online and offline. Once everything is working smoothly, you can deploy your PWA and enjoy the benefits of a more engaging, native-like user experience.
Read About Steps to hire remote developers.
Conclusion
Progressive Web Apps represent the future of web development, offering a compelling combination of reliability, speed, and engagement. Angular, with its powerful tools and framework, makes it easier than ever to build PWAs that can run on any device, online or offline. By embracing PWAs in Angular, developers can deliver high-quality, app-like experiences to users while reducing costs and development time. Whether you’re building an e-commerce site, a news platform, or a social media app, PWAs offer a modern, flexible solution that meets the needs of today’s users.
If you are looking to turn an Angular application into a PWA, discuss with our Angular Experts today.