When extending functionality in a WordPress project, modifying core files is never recommended. WordPress is updated frequently—currently at version 6.4—and any changes made directly to core files are overwritten during updates. To ensure maintainability, upgrade safety, and long-term stability, WordPress provides plugins as the standard and most reliable way to add or extend functionality.
Plugin development allows developers to customize WordPress behavior without compromising the core system. While WordPress offers an official guide for plugin development on its Codex, the documentation can feel overwhelming for beginners and even for developers transitioning from other frameworks.
To bridge this gap, this guide presents a clear, step-by-step approach to WordPress plugin development, based on real-world experience and proven workflows used at The Right Software (TRS). We will begin by covering essential concepts and foundational topics, and then move toward building a practical sample plugin, complete with working code.
Beyond writing code, effective plugin development requires a strategic mindset. Factors such as scalability, performance, security, compatibility with WordPress updates, and adherence to best practices play a critical role in delivering reliable plugins. In this comprehensive tutorial, we will walk you through the complete plugin development lifecycle—covering structure, functionality expansion, security considerations, and optimization techniques.
At The Right Software (TRS), our development team follows a disciplined and future-proof approach to WordPress plugin development. In this guide, we share those insights to help you build plugins that are robust, maintainable, and production-ready.
Topics explored
- File Structure of a WordPress Plugin
- No direct access to plugin functionality
- Plugin declarations
- WordPress hooks
- WordPress plugin security
- Sanitize, Escape, and Validate your POST Calls
- Let's actually develop a WordPress plugin
- File structure for WordPress plugin approval
- How to validate a plugin with 'Plugin check' before submitting to wordpress.org
- Optimize Your Plugin Development with Our Expertise
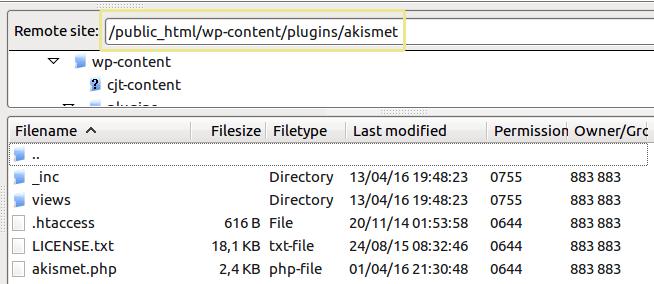
Begin the WordPress plugin development process by organizing your file structure. This step is crucial for maintaining a clean and efficient codebase:
- Go to your WordPress installation’s
wp-contentdirectory. - Open the
pluginsdirectory. - Create a new directory and name (e.g.
test-plugin). - Open your new directory.
- Create the main WordPress plugin PHP file (it’s also good to name e.g.
test-plugin.php). - Create a
readme.txtfile (discussed below) and write WordPress plugin descriptions and specifications.
The WordPress plugin needs to block direct access to PHP files by checking ABSPATH variable is defined. For this, you need to add the following code at the top of all of the plugin PHP files. For this tutorial, that file is test-plugin.php. So make sure that if you have a library or multiple plugin files then the line below is added to all the files.
defined( 'ABSPATH' ) or die( 'Nope, not accessing this' ); <?php
/*
Plugin Name: WordPress Test Plugin
Plugin URI: https://therightsw.com
Description: Test description
Version: 1.0.0
Author: therightsw
Author URI: http https://therightsw.com
License: GPL2
License URI: https://www.gnu.org/licenses/gpl-2.0.html
*/
?> Hooks are like tentacles that your WordPress plugin sinks into the WordPress core and extends or overrides the functionality. Three types of hooks are used in WordPress to override existing WordPress and add new functionality.
Filter hook
WordPress filter hooks can be added or removed and new ones can be created. To learn more about what a filter hook is, see Plugin API.
add_filter('the_content', 'custom_meta_to_content'); //gets our meta data and dispayed it before the contentAction hook
WordPress action hooks can be added or removed and also new ones can be created. To learn more about what an action hook is, see Plugin API..
add_action('admin_enqueue_scripts', 'enqueue_admin_scripts_and_styles'); //admin scripts and stylesShortcode
Mostly defined and used for adding extra functionality.
add_shortcode('wp_custom_text', 'func_wp_custom_text'); //will be used to add custom text by adding this shortcode where you want.Activation and Deactivation Hooks
Use register_activation_hook and register_deactivation_hook to execute functions upon plugin activation or deactivation.
If you want to learn about WordPress hooks and WooCommerce hooks, you can visit below article.
Related: WordPress Hooks: Actions & Filters
Generic function by using unique function and class names
All plugins must have unique function names, definitions, and class names. This prevents your plugin from conflicting with other plugins or themes. Also good for having your plugin approved by WordPress.
For example, if your plugin is called “Easy Custom Post Types“, then you might prefix your functions with ecpt_{your function name here}. Similarly, a definition of LICENSE would be better done as ECPT_LICENSE. You can use namespaces instead, however, make sure that those also are unique. A namespace or class MyPlugin is NOT all that unique.
This extends to anything in a definition. For example, if you were to use this, it would be a bad idea:
define( 'PLUGIN_PATH', plugins_url( __FILE__ ) );That definition is global, so PLUGIN_PATH could conflict with several other things.
Don’t try to use two-letter slugs anymore. As of 2016, all the good ones are taken. Instead, consider easy_cpts_ (from the first example).
Similarly, don’t use __ (double underscores), wp_, or _ (single underscore) as a prefix. Those are reserved for WordPress itself. You can use them inside your classes, but not as a stand-alone function.
Use more unique functions and class names for your plugin.
Use Nonces and Check Permissions
When you include POST/GET/REQUEST calls in your plugin, it’s important to sanitize, validate, and escape them. The goal here is to prevent a user from accidentally sending trash data through the system, as well as protecting them from potential security issues.
Sanitize:
In all instances where generated content is inserted into the database, into a file, or otherwise processed by WordPress, the data MUST be properly sanitized for security. By sanitizing your POST data when used to make action calls or URL redirects, you will lessen the possibility of XSS vulnerabilities. You should never have raw data inserted into the database, even by an update function, and even with a prepare() call.
If you had a text input field like
<input name="your-name" type="text" />
You could sanitize it using the sanitize_text_field() function.
$name = sanitize_text_field( $_POST['your-name'] );
update_post_meta( $post->ID, 'your-name', $name );
Other functions used for sanitizing the data are.
sanitize_email()sanitize_file_name()sanitize_html_class()sanitize_key()sanitize_meta()sanitize_mime_type()sanitize_option()sanitize_sql_orderby()sanitize_text_field()sanitize_textarea_field()sanitize_title()sanitize_title_for_query()sanitize_title_with_dashes()sanitize_user()
Validate:
In addition to sanitization, you should validate all your calls. If a $_POST call should only be a number, ensure it’s an int() before you pass it through anything. Even if you’re sanitizing or using WordPress functions to ensure things are safe, we ask you to please validate for sanity’s sake. Any time you are adding data to the database, it should be the right data.
For example, if you want zip code in integers then intval() function will be used to validate the input value.
$zipcode = intval( $_POST['zipcode'] );Escape:
When you’re outputting data, make sure to escape it properly, so it can’t hijack admin screens. There are many esc_*() functions you can use to make sure you don’t show people the wrong data.
In all cases, using stripslashes or strip_tags is not enough. You need to use the most appropriate method associated with the type of content you’re processing. Check that a URL is a URL and don’t just be lazy and use sanitize_text, please. The ultimate goal is that you should ensure that invalid and unsafe data is NEVER processed or displayed. Clean everything, check everything, escape everything, and never trust the users to always have input sane data.
Some commonly used helper functions
esc_html() used HTML element to enclose a section of data we’re outputting. <h2><?php echo esc_html( $title ); ?></h2>
esc_url() used for all URLs of HTML element. <img src="<?php echo esc_url( $great_user_picture_url ); ?>" />
esc_js() is intended for inline Javascript. <a href="#" onclick="<?php echo esc_js( $custom_js ); ?>">Click me</a>
esc_attr() can be used on the data into an HTML element’s attribute. <div id="<?php echo esc_attr( $element_id ); ?>"></div>
esc_textarea() encodes in textarea element. <textarea><?php echo esc_textarea( $text ); ?></textarea>
1) Create a plugin directory in /wp-content/plugins and name it WordPress-Custom-Text-Shortcode.
2) Create trs-custom-text.php file and add plugin declaration:
<?php
/*
Plugin Name: WordPress Custom Text Shortcode
Plugin URI:  https://therightsw.com
Description: You can add your desired text anywhere in website by using WordPress Custom Text Shortcode.
Version:     1.0.0
Author:      therightsw
Author URI:  http https://therightsw.com
License:     GPL2
License URI: https://www.gnu.org/licenses/gpl-2.0.html
*/
3) Activation/Deactivation:
function wp_custom_text_activation() {
}
register_activation_hook(__FILE__, 'wp_custom_text_activation');
function wp_custom_text_deactivation() {
}
register_deactivation_hook(__FILE__, 'wp_custom_text_deactivation');
4) Create custom menu hook to diplsay plugin menu in wp-admin:
// create custom plugin settings menu
add_action('admin_menu', 'wp_custom_text_create_menu');

function wp_custom_text_create_menu() {

	//create new top-level menu
	add_menu_page('Custom Text Shortcode Plugin Settings', 'Custom Text Shortcode', 'administrator', __FILE__, 'wp_custom_text_settings_page' );

	//call register settings function
	add_action( 'admin_init', 'register_wp_custom_text_settings' );
}
5) Register plugin setting:
function register_wp_custom_text_settings() {
	//register our settings
	register_setting( 'trs-custom-text-settings-group', 'wp_custom_text' );
}
6) Setting display page code:
function wp_custom_text_settings_page() {
?>
<div class="wrap">

<h1>Your Custom Text></h1>

<form method="post" action="options.php">


   <table class="form-table">
      <tr valign="top">
        <th scope="row" </td>
        </tr>
    </table>


</form>

</div>
7) Create shortcode used to display custom text:
add_shortcode("wp_custom_text_shortcode", "wp_custom_text_shortcode_function");

function wp_custom_text_shortcode_function() {
return get_option( 'wp_custom_text' );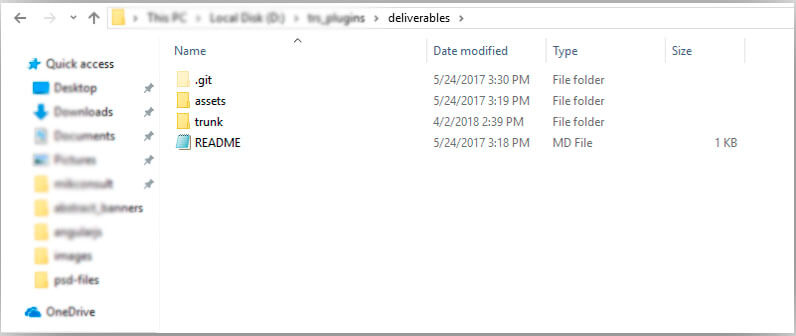
} If you plan to submit the plugin you developed to the WordPress.org plugins directory, it’s essential to adhere to a specific file structure for approval:
- Readme.md File: Contains essential information about your plugin.
- Assets folder: Houses plugin screenshots, CSS, and JS files.
- Trunk folder: Stores the plugin’s PHP files.
Remember, the .git folder is for internal use and can be discarded. Since WordPress.org utilizes SVN version control, not Git, keep your structure compliant.
Regular updates
Stay proactive with updates to address security issues, improve functionality, and maintain compatibility with the latest WordPress versions.
User-Friendly interfaces
Design an intuitive and user-friendly interface for your plugin settings. Clear navigation and instructions contribute to a positive user experience.
Comprehensive documentation
Provide detailed documentation for your plugin, including installation guides, FAQs, and troubleshooting tips. This helps users understand and utilize your plugin effectively.
Testing across environments
Test your plugin in various environments to ensure compatibility with different server configurations, PHP versions, and WordPress setups.
Download above sample plugin from given link. https://github.com/TheRightSoftware/WordPress-Custom-Text-Shortcode
Plugin Check is a tool for testing whether your plugin meets the required standards for the WordPress.org plugin directory. With this plugin you will be able to run most of the checks used for new submissions, and check if your plugin meets the requirements.
To validate a plugin before submitting it to WordPress.org using the “Plugin Check” tool, you can follow these steps:
Ensure your plugin adheres to the WordPress Plugin Developer Handbook guidelines: Make sure your plugin meets the requirements and guidelines set by WordPress. This includes having a valid plugin header, using proper coding practices, and following the WordPress coding standards.
Set up a local development environment: Install WordPress on your local machine or set up a local development environment using tools like XAMPP, WAMP, or Vagrant. This allows you to test your plugin without affecting your live website.
Test your plugin: Activate your plugin on your local WordPress installation and thoroughly test its functionality. Ensure that all features work as expected and that there are no errors or conflicts with other plugins or themes.
Install the “Plugin Check” tool: The “Plugin Check” tool is a plugin developed by WordPress.org to help identify potential issues and conflicts in plugins. Install and activate the “Plugin Check” plugin on your local WordPress installation.
Run the “Plugin Check” tool: Once the “Plugin Check” plugin is activated, navigate to the “Tools” menu in your WordPress dashboard and select “Plugin Check.” The tool will analyze your plugin and display any warnings or errors it detects.
Address warnings and errors: Review the results provided by the “Plugin Check” tool. Address any warnings or errors by making the necessary changes to your plugin code. The tool will provide details about the specific issues it found, allowing you to fix them.
Re-test and re-run the “Plugin Check” tool: After making the required changes to your plugin, re-test it on your local WordPress installation. If you believe you have resolved the issues identified by the “Plugin Check” tool, run the tool again to verify that the warnings or errors have been resolved.
Repeat the process if needed: If the “Plugin Check” tool still identifies issues or if you encounter new warnings or errors after making changes, review and address them accordingly. Iterate this process until your plugin passes the “Plugin Check” validation.
Please note that the “Plugin Check” tool is just one step in the process of validating your plugin for submission to WordPress.org. It’s also important to thoroughly test your plugin’s functionality, ensure it follows best practices, and address any other requirements specified by WordPress.org before submitting it for review.
If you follow this detailed tutorial, you can learn to Develop a WordPress plugin. If you get stuck, fill out the form below, and we’ll be right with you. We also provide plugin development services for WordPress and all other CMS and eCommerce software.
You can also check and download our free plugins. These plugins can be seamlessly integrated into your WordPress site, offering a secure and free solution.
Related: 8 Highly Recommended WordPress Plugins
We hope this article has provided you with valuable insights and knowledge to enhance your plugin development projects. You can contact The Right Software to hire a Plugin development expert to perform these steps for you!
Frequently Asked Questions (FAQs)
What is the importance of developing a WordPress plugin?
What are the key steps involved in developing a WordPress plugin?
How should I organize the file structure of a WordPress plugin?
What are the requirements for plugin approval on WordPress.org?
For approval on WordPress.org, we suggest adhering to a specific file structure that includes a readme file, an assets folder for screenshots and files, and a trunk folder for PHP files.
What are some best practices for WordPress plugin development?
We recommend regular updates, user-friendly interfaces, comprehensive documentation, and testing across different environments as best practices for WordPress plugin development.
What security practices should be followed in WordPress plugin development?
We emphasize the use of unique functions and class names, implementing nonces for POST calls, and sanitizing, escaping, and validating POST data to enhance security.