DigitalOcean Spaces is an object storage service that can be used to store large amounts of data like images and videos etc. The DigitalOcean Spaces is like Amazon S3 storage.
To speed up WordPress and handle static file delivery, we can setup a DigitalOcean Spaces account so that we may host WordPress site data (images, video etc.) in its network storage. Please note however that DigitalOcean Spaces is not a CDN.
Here I will explain to you step by step how to integrate DigitalOcean spaces in WordPress site after you have created the DO Spaces account.
Install DigitalOcean spaces plugin
- To integrate DO Spaces with WP, we’ll be working with a DO Spaces Sync plugin
- Download DO Spaces Sync plugin from https://wordpress.org/plugins/do-spaces-sync/.
- Install the plugin and activate it.
- Go to Digitalocean.com -> API -> Spaces access keys -> Generate New Key and copy the access and secret keys.
- Go to WP Settings -> DigitalOcean spaces sync menu and fill the fields with your information.
- Enter container name and Spaces endpoint name from your DO Spaces settings.
- Click “Check the connection” button to check your setup.
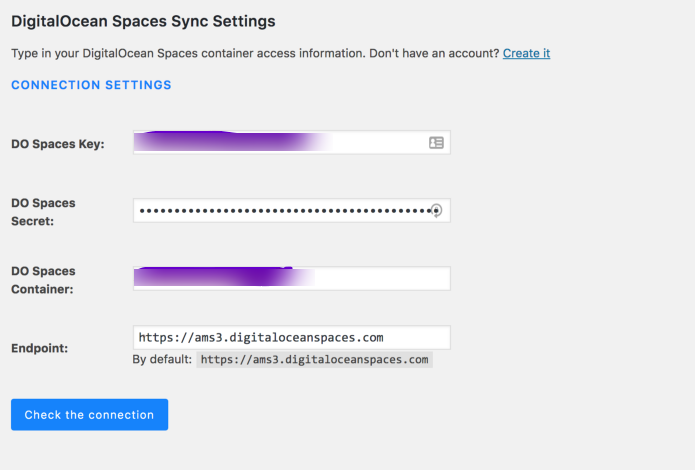
- After you got a message “Connection is successfully established. Save the settings.”, fill the below “FILE & PATH SETTINGS”.

With the above settings, when a WP uploads media then it will automatically sync with DigitalOcean spaces (stored into DigitalOcean spaces storage). However, it will not sync your existing WP media files. Please also note to check/uncheck Delete file from cloud storage ... checkbox according to need.
Sync existing media with DigitalOcean Spaces by performing the following steps.
Setting Up s3cmd 2.x with DigitalOcean Spaces
To perform this step, you have to access your server (or cloud) command line with a user that has root (sudo) permission. After logging in, you have to install a s3cmd. s3cmd is a popular cross-platform command-line tool for managing S3 and S3-compatible object stores. For our clients, we used a DigitalOcean droplet using Ubuntu OS.
Initialize the Configuration File
Run the following command on the server’s command line.
sudo s3cmd –configure
Enter Access Keys
Go to Digitalocean.com -> API -> Spaces access keys -> Generate New Key and copy the access and secret keys. Note, use the same keys that you generated in the step of DO Spaces Sync plugin.
Enter your keys, then accept US for the Default Region because the region information isn’t relevant to DigitalOcean.
Enter new values or accept defaults in brackets with Enter.

Refer to user manual for detailed description of all options.

Access key and Secret key are your identifiers for Amazon S3. Leave them empty for using the env variables.

Access Key []: EXAMPLE7UQOTHDTF3GK4

Secret Key []: exampleb8e1ec97b97bff326955375c5

Default Region [US]:
Enter the DigitalOcean Endpoint
Amazon users use “s3.amazonaws.com” for S3 Endpoint but we need to modify it to the target DO Spaces.
S3 Endpoint [s3.amazonaws.com]: ams3.digitaloceanspaces.com
Then enterURL template to access your bucket, which is the S3 equivalent of a Space. You can use the variable %(bucket)s to stand in for the name of your space. Enter the following template format exactly as written: %(bucket)s.ams3.digitaloceanspaces.com. Again, you will change this if your Space is in a different region.
Use “%(bucket)s.s3.amazonaws.com” to the target Amazon S3. “%(bucket)s” and “%(location)s” vars can be used if the target S3 system supports dns based buckets.
DNS-style bucket+hostname:port template for accessing a bucket []: %(bucket)s.ams3.digitaloceanspaces.com
Optional: Set an Encryption Password
The next prompt is for an optional encryption password. Unlike HTTPS, which protects files only while in transit, GPG encryption prevents others from reading files both in transit and while they are stored on DigitalOcean. Just press enter if you don’t want to set a password.
Encryption password is used to protect your files from reading by unauthorized persons while in transfer to S3

Encryption password:
The next prompt asks for the path to the GPG program. On Linux, you can accept the default by pressing ENTER.
Path to GPG program [/usr/bin/gpg]:
Connect via HTTPS
The next prompt asks to use the HTTPS protocol. HTTPS protects data from being read while it’s in transit.
DigitalOcean Spaces doesn’t support unencrypted transfer, so you must use HTTPS. Press ENTER to accept the default.
When using secure HTTPS protocol all communication with Amazon S3

servers is protected from 3rd party eavesdropping. This method is

slower than plain HTTP, and can only be proxied with Python 2.7 or newer

Use HTTPS protocol [Yes]: Yes
Optional: Set a Proxy Server
Skip this part if you do not use a proxy server (as we did not and can’t provide much info on this step). You can visit the DigitalOcean website for documentation.
Confirm, Test, and Save Settings
After the prompt for the HTTP Proxy server name, the configuration script presents a summary of the values it will use, followed by the opportunity to test them:
New settings:

Access Key: EXAMPLES7UQOTHDTF3GK4

Secret Key: b8e1ec97b97bff326955375c5example

Default Region: US

S3 Endpoint: ams3.digitaloceanspaces.com

DNS-style bucket+hostname:port template for accessing a bucket: %(bucket)s.ams3.digitaloceanspaces.com

Encryption password: secure_password Path to GPG program: /usr/bin/gpg

Use HTTPS protocol: True

HTTP Proxy server name:

HTTP Proxy server port: 0

Test access with supplied credentials? [Y/n] Y
When the test completes successfully, enter Y to save the settings:
Please wait, attempting to list all buckets...

Success. Your access key and secret key worked fine :-)

Now verifying that encryption works...

Success. Encryption and decryption worked fine :-)

Save settings? [y/N] Y
If the test fails or you choose N you’ll have the opportunity to retry the configuration. Once you save the configuration, you’ll receive confirmation of its location:
Configuration saved to '/home/ubuntu/ams3'
Using S3cmd 2.x to sync WP files to DO Spaces
Till now, you have setup and configured the s3cmd plugin required to manually sync all files from WP with DO Spaces. Now, we must run the s3cmd to do perform the sync.
Although a list of commands and a details discussions is available on DO website. However, we require only one command, example of which is given below. You can make changes according to your unique situation.
sudo s3cmd put /var/www/example.com/wp-content/uploads/pdf/* s3://images --acl-public --add-header=Cache-Control:max-age=86400 --recursive
The command when run will take some time but will show you recursive list of files being copied. Of special note here is the --acl-public switch which makes the file available publicly through the DO Spaces url such as example.ams3.digitaloceanspaces.com/images/pdf/BWF-62470.pdf
You can then update the paths in your pages, posts or plugins to reflect the file location. You can even delete files from local WP storage to save storage space or keep the files centrally on DO servers.
A Word of Caution!
While adding DO Spaces Sync plugin in WP is easy enough, the plugin is not actively maintained and makes changes to `wp-options` table. The site admin must go to database and remove those changes manually by searching the table entries.
[hr height=”30″ style=”default” line=”default” themecolor=”1″]
Need help? Let us know if you require any help with setting up DigitalOcean Spaces with WordPress. Our WordPress specialists are here to help you, Feel free to contact us at The Right Software.