


Introduction
In today’s digital age, online payments are an integral part of e-commerce platforms, SaaS applications, and various online services. Stripe is one of the most popular payment processing platforms, known for its simplicity, security, and developer-friendly APIs. Integrating Stripe with an Angular application can streamline payment handling, ensuring smooth transactions with minimal hassle.
This guide will take you through the process of integrating Stripe into an Angular application, explaining key concepts, and walking you through the setup step by step. The is compatible with Angular 14 to Angular 18, ensuring you have access to the latest features and best practices in your development process.
Understanding Stripe Angular
Stripe is a payment processing platform that enables businesses to accept payments online, through web/mobile apps, and in-person. It supports multiple payment methods such as credit cards, debit cards, bank transfers, and even digital wallets like Apple Pay and Google Pay. Stripe’s powerful API allows developers to seamlessly integrate payments into their applications while ensuring top-notch security and compliance with international regulations.
Angular, on the other hand, is a powerful JavaScript framework for building modern, single-page client applications. The integration allows you to explore the best of both worlds – the flexibility and robustness of Angular 18 combined with the fast and reliable payment processing capabilities of Stripe.
Why Use Stripe in Angular?
Stripe is a great choice for Angular 18 applications due to its simplicity and flexibility. It offers pre-built UI components and easy integration options, allowing developers to focus on building features without worrying about complex payment logic. Angular’s component-based architecture pairs well with Stripe, making it easy to modularize payment forms and related logic.
Benefits of Using Stripe
Security: Stripe handles sensitive payment information, ensuring PCI compliance and reducing the burden on developers.
Ease of Integration: Stripe provides SDKs, libraries, and pre-built UI components, allowing for fast and straightforward integration.
Global Payment Methods: Stripe supports multiple currencies and payment methods, making it ideal for global applications.
Developer-Friendly: With detailed documentation and robust API support, Stripe is favored by developers for its clear instructions and reliable tools.
Latest Topic About Angular 18: Zoneless change detection in Angular 18
Prerequisites for stripe angular integration
Before we dive into the integration process, ensure that you have the following set up on your development machine:
- Node.js and NPM: Make sure you have the latest stable version of Node.js and NPM installed. You can download them from the official Node.js website (https://nodejs.org).
- Angular CLI: Install the Angular CLI globally using the command
npm install -g @angular/cli. The Angular CLI is a command-line tool that helps you create, develop, and maintain Angular applications. - Stripe Account: Sign up for a Stripe account (https://stripe.com).
This is necessary for generating API keys and managing payments.
Create a new Angular App
If you don’t already have an Angular project, you can quickly create one using the Angular CLI. Here’s how you can set up a new Angular project:
1. Generate a new Angular app
Run the following command to create a new Angular 18 project:
ng new stripe-angular-app2. Navigate to the project directory
cd angular-stripe-app3. Install the Stripe Package
You’ll need to install the official Stripe package and related dependencies in your Angular 18 project. Run the following command to install Stripe:
npm i ngx-stripe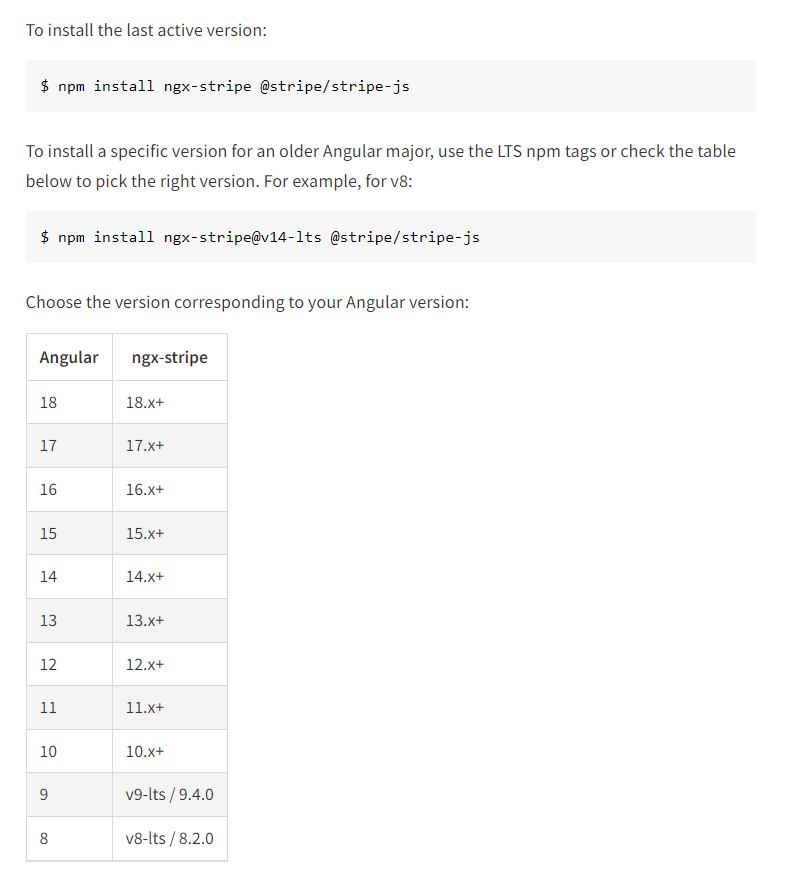
Note: If you encounter version compatibility issues during installation, you should visit the official npm site to check the compatible version with your Angular version and install it accordingly.
4. Configure Stripe in Your Angular App
Once installed, configure Stripe in your app by creating a Stripe module. First, go to your app.module.ts file and import the required NgxStripeModule:
import { NgModule } from '@angular/core';
import { BrowserModule } from '@angular/platform-browser';
import { NgxStripeModule } from 'ngx-stripe';

@NgModule({
  declarations: [
    // your components
  ],
  imports: [
    BrowserModule,
    NgxStripeModule.forRoot()
  ],
  providers: [],
  bootstrap: [AppComponent]
})
export class AppModule { }
5. Create Payment Component
ng g c payment6. Create Payment Form
Next, create a payment form that accepts the user’s payment details. For example, in payment.component.html, add the following form:
<main class="form-checkout w-100 m-auto">
  <div>
    <img class="mb-5" src="https://therightsw.com/wp-content/uploads/2023/10/TRSLogo.png" alt="" height="40">
    <h1 class="h3 mb-4 fw-normal">Angular Stripe Payment</h1>

    <div class="form-floating mb-2">
      <input type="number" class="form-control" id="floatingAmount" placeholder="Amount" [(ngModel)]="stripeAmount"
        required>
      <label for="floatingAmount">Amount</label>
    </div>

    <button class="btn btn-primary w-100 py-2" type="submit" (click)="checkout()">Pay Now <span *ngIf="isLoading"
        class="spinner-border spinner-border-sm" aria-hidden="true"></span></button>
  </div>
</main>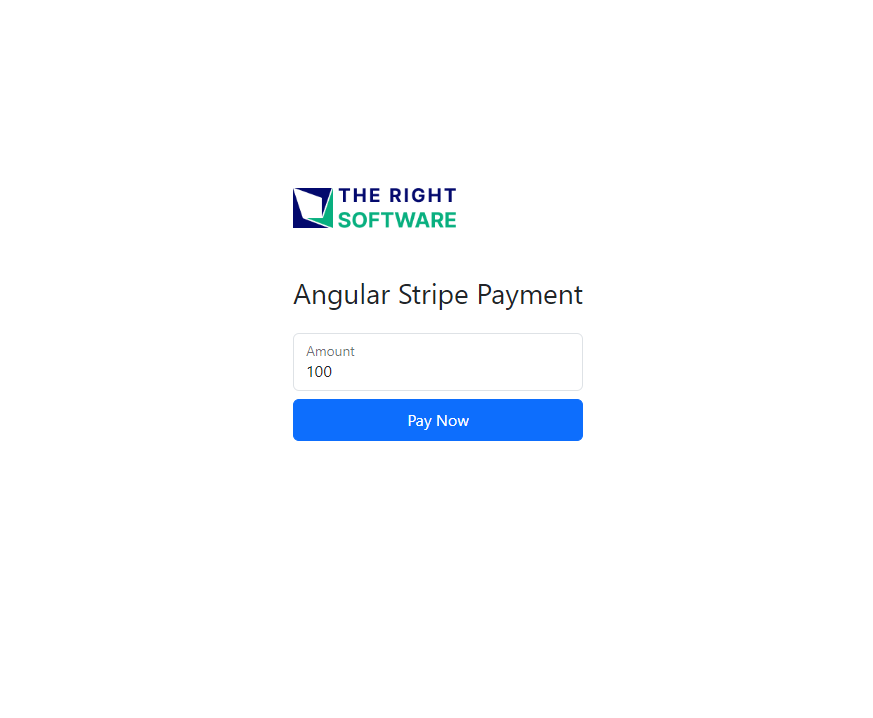
Note: We have added some Bootstrap classes for design purposes; you can design it any way you like.
In the corresponding payment.component.ts file, handle the form submission and Stripe payment processing:
First import `StripeFactoryService` and `StripeInstance` from `ngx-stripe` In the payment-component.ts file.
import { StripeFactoryService, StripeInstance } from "ngx-stripe";Then import `HttpClient` and `HttpHeaders`:
import { HttpClient, HttpResponse } from '@angular/common/http';Then Import SwitchMap:
import { switchMap } from "rxjs";- Import Environment Variables:
import { environment } from "../environments/environment"Declare Variables:
public stripe!: StripeInstance;
  public stripeAmount!: number;
isLoading: boolean = false;- Inject Services in Constructor:
 constructor(private http: HttpClient,
   private stripeFactory: StripeFactoryService) { }
Now Dynamically Load Stripe Script and set default amount in ngOnInit()
ngOnInit(): void {
this.stripe=
this.stripeFactory.create(environment.stripePublicKey );
this.stripeAmount = 100;
}- Finally the checkout function:
checkout() {
    this.isLoading = true;
    const host = 'http://localhost:7000';
    this.http.post(host + '/create-checkout-session', { data: { amount: this.stripeAmount * 100 } }, { observe: 'response' })
      .pipe(
        switchMap((response: HttpResponse<Object>) => {
          const session: IStripeSession = response.body as IStripeSession;
          return this.stripe.redirectToCheckout({ sessionId: session.id });
        })
      )
      .subscribe(result => {
        // If `redirectToCheckout` fails due to a browser or network
        if (result.error) {
          console.log(result.error)
        }
      });
  }
Add An Interface:
interface IStripeSession {
  id: string;
}
All the pieces aligned:
import { HttpClient, HttpResponse } from '@angular/common/http';
import { Component } from '@angular/core';
import { StripeFactoryService, StripeInstance } from "ngx-stripe";
import { switchMap } from "rxjs";
import { environment } from "../environments/environment"

interface IStripeSession {
  id: string;
}
@Component({
  selector: 'app-root',
  templateUrl: './app.component.html',
  styleUrls: ['./app.component.css']
})
export class AppComponent {
  public stripe!: StripeInstance;
  public stripeAmount!: number;
  isLoading: boolean = false;

  constructor(private http: HttpClient,
    private stripeFactory: StripeFactoryService) { }

  ngOnInit(): void {
    this.stripe = this.stripeFactory.create(environment .stripePublicKey);
    this.stripeAmount = 100;
  }

  checkout() {
    this.isLoading = true;
    const host = 'http://localhost:7000';
    this.http.post(host + '/create-checkout-session', { data: { amount: this.stripeAmount * 100 } }, { observe: 'response' })
      .pipe(
        switchMap((response: HttpResponse<Object>) => {
          const session: IStripeSession = response.body as IStripeSession;
          return this.stripe.redirectToCheckout({ sessionId: session.id });
        })
      )
      .subscribe(result => {
        // If `redirectToCheckout` fails due to a browser or network
        if (result.error) {
          console.log(result.error)
        }
      });
  }
}
7. Handle Payment Processing
Finally, handle payment intents on the server side. Stripe recommends creating payment intents to securely process payments. You’ll need a backend server that communicates with Stripe using your secret key.
Here’s a breakdown of the code for creating an HTTP server using Express and Stripe:
// Import necessary modules
require(‘dotenv’).config();
const express = require('express');
const app = express();
const bodyParser = require("body-parser");
const cors = require("cors");
const port = 7000;
const Stripe = require('stripe');
const stripeSecretKey = process.env.secret_key;
Creating a Checkout Session:
app.post('/create-checkout-session', async (req, res) => {
    const stripe = Stripe(stripeSecretKey);
    const domain = `http://localhost:${port}`;
    // Get amount from the request body, fallback to default 1000 (which is $10.00 in cents)
    const amount = req.body?.data?.amount || 1000;
    try {
        // Create Stripe session
        const session = await stripe.checkout.sessions.create({
            payment_method_types: ['card'],
            line_items: [
                {
                    price_data: {
                        currency: 'usd',
                        product_data: {
                            name: 'Test payment',
                        },
                        unit_amount: amount, // Stripe expects the amount in cents (e.g., 1000 = $10.00)
                    },
                    quantity: 1,
                },
            ],
            mode: 'payment', // This session is for a one-time payment
            success_url: `${'http://localhost:4200'}/stripe-successful-payment?hash=hash`,
            cancel_url: `${‘http://localhost:4200’}/stripe-canceled-payment?hash=hash`,
            expand: ['payment_intent']
        });

        return res.send(session);
    } catch (err) {
        console.log('stripe error', err);
    }
});
Creating a Stripe Checkout Session:
The stripe.checkout.sessions.create method is called to generate a new session for payment. The session includes:
payment_method_types: Specifies that the payment will be made via a credit card.
line_items: Contains product information, including the price and currency (in this case, USD), and the amount (in cents).
mode: Set to ‘payment’ to signify a one-time payment.
success_url: Redirect URL after a successful payment. This can be a route in your Angular app, where you’ll handle the post-payment process.
cancel_url: Redirect URL if the user cancels the payment.
expand: Allows you to expand objects in the response, such as payment_intent, to include additional details about the payment intent.
Starting the Express Server:
app.listen(port, () => console.log(`Listening on port ${port}!`));All the pieces aligned:
// create http server for stripe api
const express = require('express');
const app = express();
const bodyParser = require("body-parser");
const cors = require("cors");
const port = 7000;
const Stripe = require('stripe');
const stripeSecretKey = 'your stripe secret key'
app.use(bodyParser.json());
app.use(cors());

app.post('/create-checkout-session', async (req, res) => {
    const stripe = Stripe(stripeSecretKey);
    const domain = `http://localhost:${port}`;
    //get amount
    const amount = req.body?.data?.amount || 1000;
    try {
        //create stripe session
        const session = await stripe.checkout.sessions.create({
            payment_method_types: ['card'],
            line_items: [
                {
                    price_data: {
                        currency: 'usd',
                        product_data: {
                            name: 'Test payment',
                        },
                        unit_amount: amount,
                    },
                    quantity: 1,
                },
            ],
            mode: 'payment',
            success_url: `${'http://localhost:4200’}/stripe-successful-payment?hash=hash`,
            cancel_url: `${‘http://localhost:4200’}/stripe-canceled-payment?hash=hash`,
            expand: ['payment_intent']
        });

        return res.send(session);
    } catch (err) {
        console.log('stripe error', err);
    }
});

app.listen(port, () => console.log(`Listening on port ${port}!`));
8. Final Result
Related: Stripe Integration in Ionic Apps
Use Cases of Stripe with Examples
E-commerce Platform: For example, an Angular-based online store can integrate Stripe to handle payments for purchases. The user selects products, fills in shipping details, and Stripe processes the payment securely.
SaaS Applications: In a SaaS platform offering monthly subscriptions, Stripe can handle recurring payments. Developers can integrate Stripe to manage subscriptions, cancellations, and payment updates.
Charity Donation Site: Stripe is ideal for donation websites, where users can easily contribute using credit cards or other payment methods.
Related: You can also read about the Integration of stripe on demanding app and Integrating apple pay with stripe.
Conclusion
Integrating Stripe with Angular 18 simplifies the process of managing payments, providing a seamless, secure, and efficient solution for developers and users alike. Whether you are building an e-commerce platform, a SaaS application, or a custom web solution, Stripe’s robust tools and Angular’s flexibility make them a perfect match. By following the steps outlined above, you can have a functional and secure payment system integrated into your Angular 18 application in no time.
If you need assistance with your Stripe and Angular integration, or want to discuss with Angular 18 Experts at The Right Software. We’re always here to help you deliver the best possible solutions for your business.